In the busyness of life, sometimes passwords can get misplaced or forgotten. If this is the case, and you are using OS X, we have a few suggestions to help you out. If you have an older OS X install CD you can use that to reset your older Mac (pre 10.6). If you have Snow Leopard (10.6) but don’t have a disk you can use the ‘Single User Mode’ method. These days Apple Macs don’t come with disks so we need to use the Recovery Partition or one of the other methods. These methods include using another Administrator account, or using your Apple ID to change the password if you have set these up previously.
OS X Install Disk:
Insert your 10.6 disk (or older) into your computer. Then double-click on the Install Mac OS X icon.
If the computer is off then boot from the CD by Holding down C when you switch on.
- On the language Chooser screen select your language > Continue (button looks like an arrow)
- One the installer screen > chose Utilities > Reset Password.
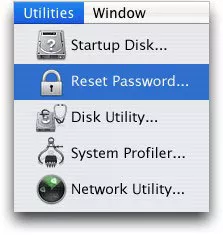
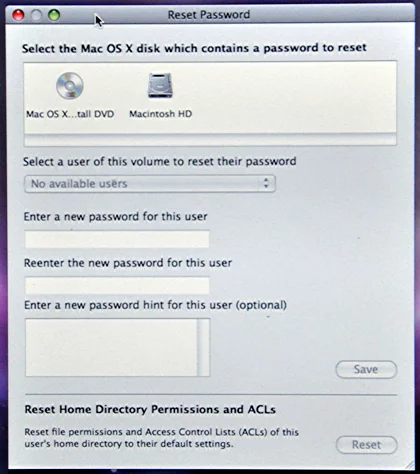
Don’t press ‘Reset’ at the bottom of the screen unless you want to change access permissions on any folders you have shared.
Recovery Partition reset:
This method works for OS X 10.7 – Lion and newer. (Mountain Lion, Mavericks, Yosemite, El Capitan) as they come with a hidden recovery partition. (The command key is the Apple key).
- Restart the Mac if its on, or switch it on.
- As soon as you hear the chime press and hold Command and R keys together. (or press Alt, wait for the choice and chose Recovery HD). You will see the Apple logo and spinning gear (or progress bar in Yosemite).
- Soon you will see a screen titled OS X Utilities. Don’t click on anything here. Click on the menu barf at the top and select Utilities > Terminal.
- A terminal windows will open. Type resetpassword and then press Return.
- In the new screen that opens select the main system hard drive (probably only one option).
- Choose the administrator account and fill in the new password. Press Save.
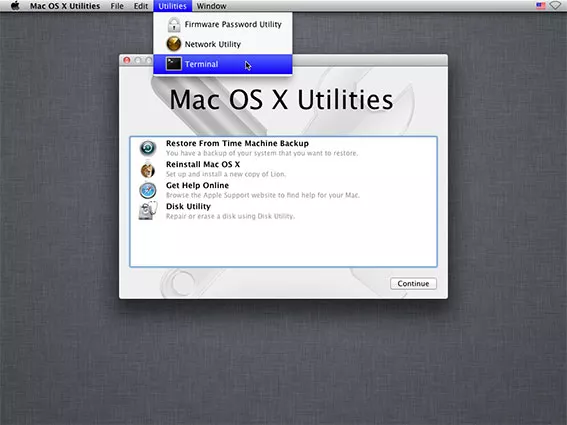
You can go back to the previous screen and chose Utilities > Quit OS x Utilities, or reboot.
No Disk, ‘Single User Mode’
Switch the computer on and hold down the command and S keys, to enter this mode. (If you are using a Windows keyboard then the windows key is the command key).
- Press Enter after all commands in bold.
- Type: fsck –fy Wait a while.
- Then type: mount –uw / This will mount the drive.
- Then type: is /users (optional) This lists all user accounts so you can chose one.
- Then type: passwd username - expect username will be the name is the account.
- Then enter the new password when prompted. (It will not confirm).
While you are at it you could check the drive for errors by running this command: /sbin /fsck -fy
Change Using Apple ID
For this to work you must have previously selected the check box “Allow user to reset password using Apple ID”. This will have been done when the computer was first used or when the OS was upgraded. To check if this is enabled: System Preferences > Users & Groups > Select User
- To reset, log off your account and enter your password incorrectly three times.
- A popover will appear, select the arrow icon to open the dialogue box.
- Type your Apple ID and its password. Select Reset Password.
- Type a new password and hint.
If you have forgotten you Apple ID visit the site to change it: https://iforgot.apple.com
Reset Using Another Administrator
Log into an Administrator account of which you know the password, then go here:
System Preferences > Users & Groups
Select the User and click on Reset Password. You might need to click on the padlock icon at the bottom and enter your password, to allow changes.
Keychain Password
Unfortunately also need to delete the Login keychain and make a new one, so that your keychain is unlocked when you log in.
Do this here: /Applications/Utilities, and choose Keychain Access > Preferences.
In the general pane you will see a Button labelled ‘Reset My Default Keychain’ In later versions of OS X. Crate a new one with the new password.
