You can use the Exchange admin center (EAC) or the Exchange Management Shell to change the mailbox storage quotas for certain mailboxes. When a mailbox reaches its specified storage quota, Users receive a notification warning them of the low free space.
You can also make the changes at organisation level, on the whole mailbox.
If you're interested in migrating to Office 365, download this guide by our install team
You can also learn more about our Office 365 solutions today.
How to change mailbox size in Exchange using the Exchange Admin Centre
1. Login to the Exchange Admin Centre using an account with Exchange Administrator privileges
2. From the Recipients / Mailboxes page, open the mailbox which you want to adjust
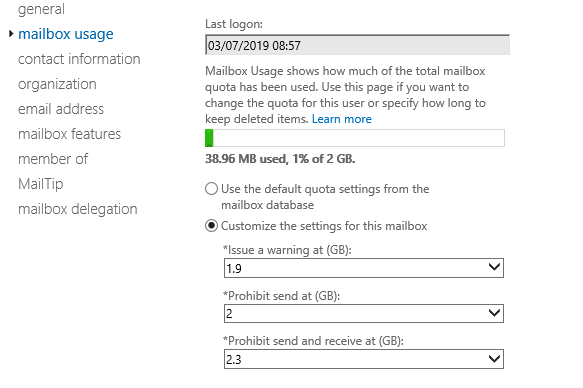
3. Select ‘Mailbox Usage’
4. Under ‘Customize the settings for this mailbox’, enter your preferred values
5. Click on Save
When setting custom settings for Mailbox size. There are three options to look at:

Issue a warning at (GB): Exchange will send a warning message to the user if their mailbox reaches this size.
Prohibit send at (GB): If the mailbox size reaches or exceeds this limit, Exchange will prevent the user from sending any further messages.
Prohibit send and receive at (GB): If the mailbox size reaches this specified limit, Exchange will prevent the mailbox from sending new messages and won't deliver any new messages to the mailbox.
You can also use the Exchange Management Shell to configure storage quotas for a mailbox...
How to change mailbox size in Exchange using the Exchange Management Shell
1. Open the Exchange Management Shell using an account that has Exchange Administrator privileges
2. Enter the following, replacing ‘Joe Bloggs’ with the mailbox name of your choice
Set-Mailbox -Identity "Joe Bloggs" -IssueWarningQuota 4.5gb -
ProhibitSendQuota 4.75gb -ProhibitSendReceiveQuota 5gb -
UseDatabaseQuotaDefaults $false
3. Hit Enter
So, this will set Joe Bloggs’s mailbox limits as:
IssueWarningQuota 4.5gb
ProhibitSendQuota 4.75gb
ProhibitSendReceiveQuota 5gb
UseDatabaseQuotaDefaults $false is needed to set custom attributes

On some occasions you will want to make mailbox quota changes across the whole organisation. You can do so using the EAC, or using PowerShell…
How to change mailbox size in Exchange across my entire organisation using the Exchange Admin Centre
1. Login to the Exchange Admin Centre using an account with Exchange Administrator privileges
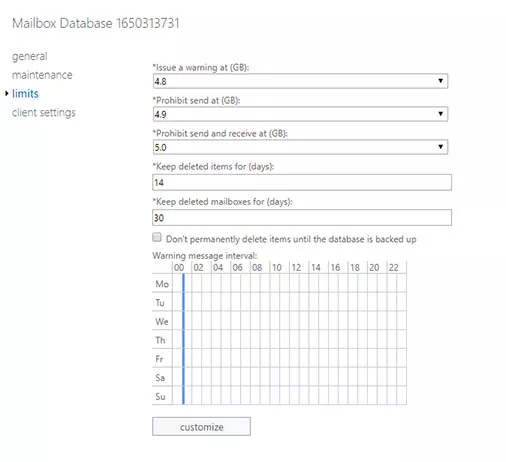
2. From the Servers / Databases page, open the database which you want to adjust
3. Select ‘Limits
4. Enter your preferred values
5. Click on Save
The example in the image will limit all mailboxes to no more than 5.0GB, with a user warning at 4.8GB and putting a blog on sending new mail at 4.9GB.

How to change mailbox size in Exchange across my entire organisation using the Exchange Management Shell
1. Open the Exchange Management Shell using an account that has Exchange Administrator privileges
2. Enter the following, replacing ‘DatabaseName’ with the mailbox name of your choice
Set-MailboxDatabase "DatabaseName" -
ProhibitSendReceiveQuota 5GB -ProhibitSendQuota 4.9GB -
IssueWarningQuota 4.8GB
3. Hit Enter


